Manna from Heaven

Recently I came across this recipe from a blog I am now completely in love with. Sarah is an amazing cook and makes real, whole, and delicious recipes.

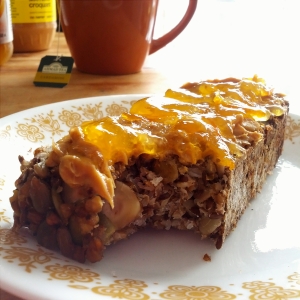
I made her “life changing loaf of bread” and it turned out perfectly. I kept thinking “this is manna from heaven!”

So if you enjoy real, whole, and delicious food check her out!

http://www.mynewroots.org/site/2013/02/the-life-changing-loaf-of-bread/

I’ve Included some pictures below of my own gluten-free version. In the recipe she uses rolled oats. I myself used toasted buckwheat and then added an extra 1/2 cup of water to make up the difference. It turned out great and my gluten-free husband was very happy!

Fermentation Orientation

Recently I started reading up on making homemade condiments! This is a totally sweet, savory, healthy, and delicious venture I came to learn. Not only do you know exactly what is going into your meals, you can also control all the additives, soy oil, preservatives, and tailor to your own tastes.

After I looked into homemade mayonnaise and saw how easy it was I was thrilled, but was disappointed that it generally lasted only 3-4 days. Now if that is your jaaammm and you use it up fast enough, or just make it when you need it, then cool! I was really hoping for something longer lasting though. Then I stumbled upon a few people talking about ‘fermentation’. The term wasn’t completely foreign to me as I was introduced to the idea a while back by my good friend Laura , and she knows her stuff! Knowing how much I would trust her judgment I delved further into this idea online. Right now I am just on the cusp of learning about this subject but totally pumped after my first project of fermented mayonnaise turned out super well! I’ve been eating it and putting it into recipes for a bit and so far DELICIOUS! I also started with a very simple recipe to get my feet wet. Now for starters let’s talk a bit about fermentation first.

Here is a link to a fantastic post on how fermented foods are great but NOT for everyone. It is an excellent unbiased view of fermenting. Sometimes I find a well rounded, and unbiased view hard to find on some natural, home-made, and health subjects. I really recommend a read of this and to do your research:

http://peelingbacktheonionlayers.com/lacto-fermented-foods-are-they-really-good-for-you/

So what IS fermentation? This link from About.com explained the basics very well:

http://chemistry.about.com/od/lecturenoteslab1/f/What-Is-Fermentation.htm

Two most common types of fermentation:

  1. Alcohol fermentation,  caused by bacteria and yeasts
  2. Lactic acid fermentation (commonly called lacto-fermentation), caused by bacteria found in yogurt etc

Some awesome facts about fermented food:

  • Fermenting has been done for thousands of years to help preserve food and promote health
  • Full of probiotics
  • These probiotics do crazy good things like increase the good bacteria in your digestive system
  • You can ferment a lot of things

I would also suggest learning about the benefits of probiotics, and what they do for you when coming from the right source. Only a few benefits are the increase of vitamin K for healthy bones, strengthen ones immune system, and help manage weight.

Now I am just a beginner at this and learning so much! If anyone has helpful advice please do share! My first project that I decided on was fermented mayonnaise. I chose to ferment with store bought Kombocha fermented tea which is a nice option for people who are lactose intolerant.

Mayonnaise Recipe:

  1. 1 large egg
  2. 1 large egg yolk
  3. lemon juice or apple cider vinegar to taste
  4. 1-2 teaspoons of salt
  5. 1/2 cup olive oil (you can do a full cup of olive oil instead of adding another oil but I find it mush more expensive)
  6. 1/2 cup of coconut, or canola oil if you don’t want a coconut taste
  7. IF FERMENTING. Lacto: 2 TBL of Whey or 2 TBL of Kombucha

I increased this amount for more.. do what works for you!

For added flavour:mayo3

  • Pepper
  • Paprika
  • Garlic  (recommend)
  • Powdered mustard
  • dijon Mustard (recommend)
  • And really whatever you like in spice try it out!


 What you need:

  1. A hand blender (you can use a regular blender although I’ve never done it myself)
  2. A mason jar. If you are using a hand blender it works best actually blending right into a mason jar and you will save a lot of mess! Otherwise what I did was blend in a tall heavy beer glass.

Steps:

  1. Put all the egg parts into your jar and blend until they are one with each other.mayo
  2. The key to mayo at home is to slowly pour your oil in while you blend…so a little stream at a time while you keep blending. If you get impatient and pour the oil in at the end there is a good chance it will separate on you.
  3. Continue till all your oil is gone… yes it’s probably been 5min!!
  4. Add all your spices, vinegar and such and keep blending till you get that lovely smooth consistency with little mountains when you lift the blender out. BLEND WELL.
  5. Now here is the decision part. If you don’t want to ferment then just put a lid on it and stick it in the fridge . But it will need to be used up in 3-4 days! Continue if you would like to ferment.
  6. As a first timer the way I did it was with a bottle of store bought Kombucha (3$ and will last 6 months in the fridge after you open it). Next time I would like to try making whey! Now just blend in your Kombucha at the end.

Fermenting Specifically Mayonnaise: 

Either you blended right into your jar or transferred from the blender/container. Simply put your mason jar lid on tightly, and one that is meant for a mason jar. Then store in a spot out of direct sunlight that is room temperature for 7 hours. Then presto!

If you didn’t catch the link above here is a great link for lacto-fermentation which I plan to try next:

http://ournourishingroots.com/real-food-101-how-to-make-whey-and-cream-cheese/

I am so excited about this! 🙂

mayo2

Simple 2$ Tank

Recently I’ve been attracted to recycling old T-shirts. Whether making a bag or a tank top this can be a very economical way to reuse them plus the fun of making yourself something unique.

image

I personally went to my local Salvation Army Thrift store and got a 2$ T with a front I enjoyed.
The method I used for tasseling the ends of the tank is the same as the ‘no sew felt blanket’ basically the method is really nice because all the tassels lay straight down. If you aren’t sure how to tie them just search ‘no sew felt blanket’. Side note that that project is also really cool.

image

1. Basically I started by cutting the tassels along the bottom and then periodically put the T on to see where I wanted them to hit exactly.
2. Then I cut my sleeves off and the neck. Leaving plenty of extra still to be cut so I could play around and decide where I wanted it to sit. Again I tried it on as I went and then decided where I would prefer more cut off.
3. Then to finish I tied all my tassels and voila my tank top!

Secretly Gluten-free Pizza

After trying a few different ways of making gluten-free pizza crust from trial and error I’ve settled on my own recipe. People don’t even ask about it because they think its just regular pizza crust! Not only that it is very simple and fast to make which saves my day every time I am craving pizza and don’t have a complicated recipe to work out. Tonight I am making my crust with delicious spinach, mushrooms, sausage, and tomatoes.

Image

Preheat oven to 350 first!

Ingredients:

*I get my gluten-free all purpose flour at Bulk Barn but when I don’t have it I also make an equal mix of rice flour, sorghum flour, and appropriate amount of guar gum.

  • 3 cups Gluten-free all purpose (plus extra for mixing)
  • 1/4 cup Corn meal (can replace with extra flour if avoiding corn)
  • 11/2 tsp Salt
  • 2 Tbls Brown Sugar
  • 1 Tbls Dry active yeast. Most brands are gluten free
  • 3/4 cup Warm water
  • 1 Tbls Olive oil

PhotoGrid_1378861978390

1. In a bowl large enough to combine everything take your warm water and wisk in your sugar till the warmth dissolves it. If the water is too hot it will kill the yeast, but it should be warm enough that the sugar dissolves. Then add the yeast with a little stir.. very little just to cover the yeast. Leave this undisturbed set aside to puff up about 8-10min. You should then see something that looks like a blob or apple sauce and no longer liquid.Image

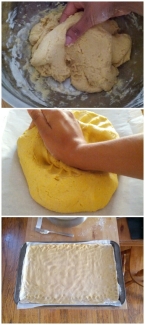
2. While your yeast is acting up in another bowl combine flour, corn meal, salt. When the yeast is ready add to it the Olive oil, and mix together, then add your flour mixture on top of that, and make into a solid dough using a fork. When I am really lazy I just plop everything into the bowl with the yeast and then mix, this also works just fine but see how you like it. During my mixing time I usually have a cup of four beside me to add here and there as I mix. Your dough should not stick to everything and if it is just add flour/ and or corn meal. On the other end if it gets too dry add a little water. When everything is well combined then I give a decent knead with my well floured hands (keep flouring your hands so they don’t stick too much). I do this for about 4min.

3. Next transfer your dough onto a baking sheet covered with lightly floured parchment paper. I like dusting everything with flour because its just way easier. Using your hands push and shove your dough out to all the corners, especially out from the center and up the sides to make a crust. The dough will rise considerable so don’t worry about how thin it gets. In fact if you make two smaller pizzas with this recipe it also makes a fantastic thin crust.

4. Now pre-bake your crust for 15-20min or until it starts to crack and is for the most part cooked. Once ready take out and allow to cool for a few min so its not piping hot. Then add the pizza sauce of your choice and toppings then pop back in the oven for 15-20 or until the cheese is melted and your crust is nice and browned. I also made a little mixture of olive oil, salt, pepper, and rosemary that I coated the crust with!

Bon Appétit!

Love Letters

For my wedding this year I did paper roses using this excellent tutorial:

http://www.100layercake.com/blog/2011/07/22/diy-storybook-paper-roses/

Not only was it pennies to make they also meant so much more to me. Although for my own I chose to print out our love letters on ivory paper. I love this idea for doing something sentimental. You could use a map from somewhere you traveled to or an old and loved book that is now falling apart.

This is my own Bouquet here and the BEST part is it makes a great mantle piece now.

Image

Zucchini Cheap & Easy

I’ve been really into zucchini recipes lately and want to share my two favorites. They are both very easy and cheap to make and on top of that very healthy but ridiculously yummy. Both of theses recipes I got form a great website called budget bites.

Zucchini Fries:http://www.budgetbytes.com/2012/07/baked-zucchini-fries/

Zucchini Pizza Boats:http://www.budgetbytes.com/2011/04/zucchini-pizza-boats/

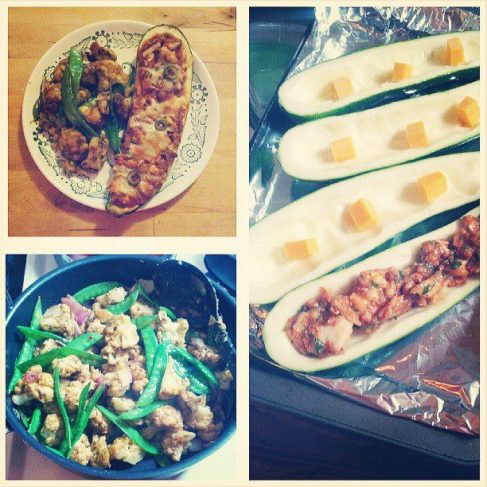
Both of these I made and loved. I did however add a lot more spices to my zucchini boats like tarragon and some garlic. In the picture you see the meal I made with my pizza boats along with a curried cauliflower stir-fry!Image

No-poo

This blog is about my adventures trouble shooting living a more natural, economical, and creative life full of learning new things and getting out of the box. Recently I started a group where I invite ladies into my home every week to talk about the bible and learn something new! Here along with my instagram #DIYmere you will find our projects along with other things I’ve found via my research.
My entire goal is to live more off the grid, be self-sufficient and share that with others. 

 
1 Peter 3:8-19 
 

All in one Complete-poo

Ingredients:
  • 2 cups water (multiply recipe to desired amount)
  • 1 TBLS baking soda
  • 2 Black tea bags
  • ¼ cup liquid castile soap
  • ½ TSP Guar gum (optional-it’s a thickener)
  • Essential oils
In a pot on the stove brew your water and teabags for a good 5min. Then take off the heat and let sit for 10min. Then slowly stir in baking soda and it will foam up a bit. Let your mix cool for a bit before adding other ingredients.
Once mix is cooler wisk in your Guar gum a little at a time to avoid clumps, and after that slowly mix in castile soap. Stir in essential oils then let cool completely before transferring in to container! 
Frugal and simple Baking Soda-poo
Ingredients:
  •   2 TBLS Baking Soda
  • Water
  •  Essential oils if desired
In your bottle add soda then fill with water and give it a shake, be sure after that to shake before using!
Delicious Honey Tea-poo
Ingredients:
  • 1 cup from pot of Green Tea steeped for 30 min (I am also adding rosemary and nettle to the tea)
  • ¼ cup of vegetable glycerin
  • 1 TBLS of honey
  • Essential oils if desired
In a pot on the stove steep your tea. Let cool then stir in vegetable glycerin, and then your honey and essential oil…stir well then when totally cool transfer to containers!
 
It is a good idea to rinse your hair with apple cider vinegar as well. Not only does it condition but it will help you feel fresher. After giving natural shampoos a chance, especially just using ever so cheap baking soda, I’ve been amazed. My hair doesn’t have the dried-out feeling that the beauty world has made us accustomed too but my hair is CLEAN but also feels normal and healthy! Normally there is a ruff 6 month adjustment period that your hair goes through to then settle and be accustomed.
 
Happy Showering! DIYmere: https://www.facebook.com/DIYmere